


vpn.arizona.edu/full, then log in using your NetID.Overview
Image
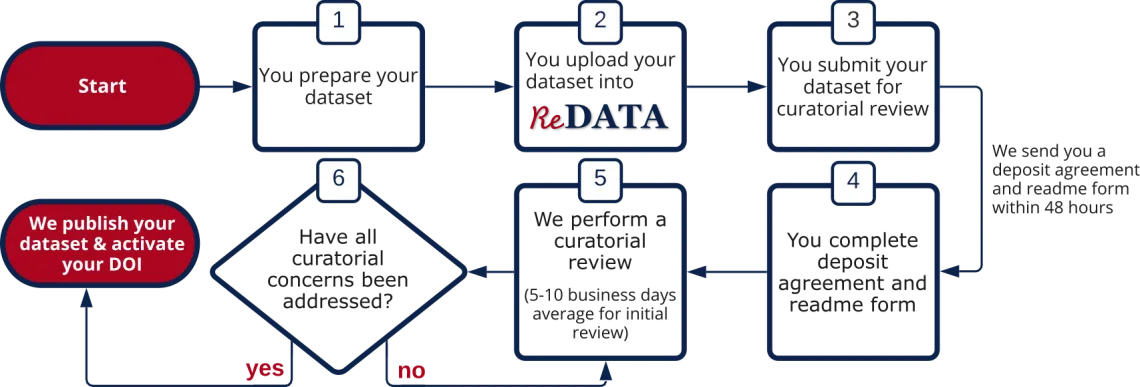
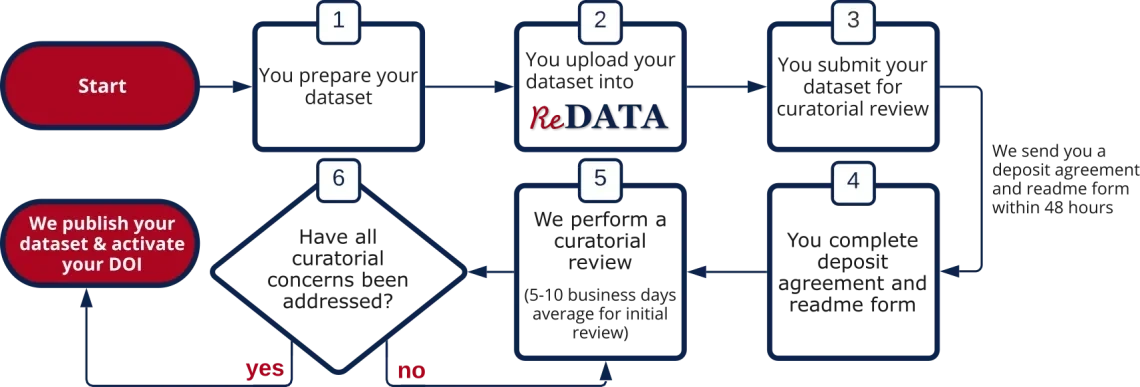
Publishing materials in ReDATA is similar to publishing a paper: you prepare your materials according to our deposit guidelines, after which you submit them for review. After an iterative review process, your materials are published.
Refer to the deposit checklist(opens in a new tab) for the complete set of steps to submit and publish your dataset. If you are submitting data associated with a journal article, consult the FAQs for additional information.
If the default storage quota is insufficient for your needs, please submit a quota increase request from within ReDATA by clicking the "Manage Storage" button or by contacting us. Refer to our quota policy for more information.
Deposit Guidelines
These general guidelines will help you prepare and organize your submission to help ensure a quick and smooth publication process.
Types of Materials Accepted
- Data files in any format (formats that do not require proprietary software to read are preferred)
- Software source code and executables (we strongly recommend consulting with Tech Launch Arizona prior to publishing potentially commercializable software)
- Non-sensitive data. Refer to ReDATA's restrictions for what kind of data cannot be uploaded
In all cases, you must be the creator or have permission from the creator for us to accept your materials for publication.
File & Folder Organization
- Files should be clearly named so others can understand their contents. Be descriptive and consistent. See File naming best practices.
- Any file complex/non-obvious file name conventions or complex folder structures must be documented. If not provided, we will request this information during our curatorial review.
- Uploading folders is allowed. See Folder structure best practices.
- If your dataset has more than 1 or 2 folders or 3 or 4 files, please place them in a Zip or other compressed file format. This makes the dataset much easier to handle and saves storage space.
- If collecting files/folders in Zip files, use one ZIP file per downloadable "chunk" of information. How to group data is up to you. For example, if your dataset contains three folders, Data, Code, and Figures, you could create three zip files: Data.zip, Code.zip, Figures.zip. That way, each part of the project can be downloaded separately without having to download everything.
Software Source Code
- Ensure all files referenced in any analysis scripts are included in your submission (or it is documented where those files may be obtained).
- If using hard-coded input file names in the source code, we recommend using relative folder paths instead of absolute paths.
- If distributing any dependencies, ensure the license allows redistribution.
- Ensure you have the rights to distribute the software, or if you created it yourself, apply an appropriate license(opens in a new tab).
Metadata
The following guidance will aid you in completing several of the metadata fields available in ReDATA.
Title
Select a descriptive title for the dataset.
- For datasets associated with publications, we recommend the format Data for "insert title of associated publication." Example: Data and Code for "Beyond greenness: detecting temporal changes in photosynthetic capacity with hyperspectral reflectance data."
- For datasets not associated with publications, we recommend selecting a title that describes what it is and includes temporal (dates, date ranges) and/or geospatial information, as appropriate. Example: Survey of Carbonyl Sulfide in Soils at 38 Sites in Europe.
Description
Add a short abstract describing the dataset. While you may add as much detail as you wish (up to 20000 characters). If the details are extensive, we recommend adding them in a separate file or entering them on the README form we send you after submission.
License
Select an appropriate license for your materials. The default is CC By 4.0. See the License Selection Matrix(opens in a new tab) for allowable licenses and information on each. If different parts of your deposit have different license requirements (e.g., if you are depositing both data and code), you have two options:
- Create two separate deposits, each with its own license. We can link them together in ReDATA upon submission. This is option is recommended if the code needs to be cited separately from the data.
- Create one deposit and set the License field in ReDATA to the license of the primary item (e.g., data). You can note the license of the other item (e.g., code) by entering the information in the Readme form we send you. This is the easier option.
Funding (optional)
Enter the grant number/name or other funding source. If your funding source is a federal grant, you may enter the grant number and it will auto-complete. Free text is also permitted.
Preview thumbnail (optional)
You have the ability to upload a custom thumbnail to represent your dataset. This image will appear on the main ReDATA page. If you do not upload an image, one will be generated for you (if possible).
Documentation
If you already have created documentation files for your dataset, please include them as part of your submission.
- Examples of documentation include readme files, user manuals, codebooks, flowcharts, etc.
- See Data documentation for help with what kind of information to include.
- If documentation is for specific parts of the dataset, be sure to indicate which parts/files/folders the documentation is for, either by indicating it within the file or by naming the file appropriately (e.g., README_software.txt).
If you have not yet created documentation, please enter it in the README form. If the documentation is brief, include it in the Description metadata field (see above).
Regardless of whether you include your own documentation or not, we will generate a standardized README.txt for you based on the README form we send you after submission
Creating Accessible Data
Web Content Accessibility Guidelines (WCAG) were designed for a wide range of digital content but may not always clearly align with complex research data. Please refer to the following guidelines and resources for common file formats as you prepare to deposit your data. The following information is not exhaustive, and no single checklist will apply to every deposit or fully address accessibility needs for every file type.
XLSX
Excel (XLSX) files allow custom formatting to support accessibility. Use to following guidelines to create accessible XLSX files:
- Structure & Formatting
- Start table in cell A1.
- Include only one table per tab.
Set headings using "cell styles" in the Excel Home tab.
- Cell Content
- Avoid blank rows, columns, and merged cells.
- Avoid using numeric values or blank cells to indicate null values. Select one value to consistently represent null values, such as “N/A” or “NONE.”
If color is used, do not rely solely on color to convey information and ensure colors have sufficient contrast with text.
- Naming Conventions
- Use descriptive file names and tab names.
- Use descriptive names for column and row headings.
- Charts & Graphs
- Provide alternative text using the guidelines for data visualizations below.
More information about how to make XLSX files accessible and use the Accessibility Checker is available from the University of Arizona Disability Resource Center Excel Help Page.
CSV
Comma-Separated Values (CSV) files store tabular data in plain text format. Formatting, text styles, and color are not retained in CSV. To make CSV files more accessible, use the following best practices:
- Cell Content
- Avoid blank rows, columns, and merged cells.
- Avoid using numeric values or blank cells to indicate null values. Select one value to consistently represent null values, such as “N/A” or “NONE.”
- Naming Conventions
- Use descriptive file names for each CSV file included in your deposit.
- Use descriptive names for column and row headings.
- Apply consistent naming conventions to headings, such as camelCase or PascalCase.
PDFs & Word Documents
Accessible source documents are the most effective way to create accessible PDFs and reduce time needed for remediation. Microsoft Word can be used to create accessible documents and review accessibility barriers before exporting to a PDF. To create accessible Word documents, use the following guidelines:
- Structure & Formatting
- Set heading styles using "Styles" in the Home tab.
- Use built-in styles in the Home tab to format lists.
- If tables are used, set the header row under "Table Design."
- Text
- Use a sans-serif font, such as Arial, Helvetica, Georgia, or Lucida Sans.
- Regular text should have a color contrast ratio of 4.5:1 with background colors.
- Headings should have a color contrast ratio of 3:1 with background colors.
If hyperlinks are present, use descriptive language to describe the purpose and target location.
- Images & Graphics
- Provide alternative text for non-decorative images and graphics using the guidelines for data visualizations below.
If you need to remediate a PDF directly, use the following resources to identify and address accessibility barriers:
The University of Arizona Disability Resource Center PDF Accessibility & Remediation help page provides guidance and resources for creating and remediating PDFs.
Adobe Acrobat can be used to review and remediate PDF accessibility.
PAC PDF Accessibility Checker(opens in a new tab) provides free diagnostics for accessibility barriers.
ASU AI Cloud Innovation Center PDF Accessibility Remediation tool(opens in a new tab) provides limited, free remediation for PDFs under 10 pages. The tool can be used up to 8 times at no cost.
Plain Text Files
Plain text documents do not allow formatting features available in other file formats. To make plain text documents accessible, use the following best practices:
- Structure
- Ensure that each heading within the file is preceded by two blank lines followed by one blank line
- Include one blank line before each paragraph
- Text
- Provide a full expansion of abbreviations used.
PowerPoint Presentations
Presentations can be made accessible using Microsoft PowerPoint tools. Use the following guidelines to make accessible PowerPoint files:
- Structure & Formatting
- Use built-in slide layouts under "New Slide" in the Home tab.
- If tables are used, set the header row under "Table Design."
- Text
- Use a sans-serif font, such as Arial, Helvetica, Georgia, or Lucida Sans.
- Regular text should have a color contrast ratio of 4.5:1 with background colors.
- Headings should have a color contrast ratio of 3:1 with background colors.
If hyperlinks are present, use descriptive language to describe the purpose and target location.
- Images & Graphics
- Provide alternative text for non-decorative images and graphics using the guidelines for data visualizations below.
The University of Arizona Disability Resource Center Accessible PowerPoint Presentations help page provides additional guidance and resources for creating accessible presentations and accessing the built-in accessibility checker.
Image Files
Common image file formats, such as PNG, JPEG, and TIFF, do not support embedded alternative text that can be reliably downloaded and accessed by users. To make images more accessible, use the following guidelines:
- Content
Data associated with the visualization should always be included in the deposit.
- Complex Data Visualizations: provide longer descriptions or data summaries in the README or separate plain text file.
- Descriptions should not draw conclusions about the patterns of the visualization. Conclusions should be left up to the user’s discretion.
- Visual attributes, such as color or gridlines, do not need to be described in the associated description.
- Provide appropriate titles and labels, numbers (or approximates if needed), and overall data trends in the associated description.
- Images: add alternative text to the README or separate plain text file.
- Alt text should be short and concise. Aim for 125 characters or less.
- Focus on the content of the image rather than explain the appearance of the image.
- Text
- Use a sans-serif font, such as Arial, Helvetica, Georgia, or Lucida Sans.
- Regular text should have a color contrast ratio of 4.5:1 with background colors.
- Headings should have a color contrast ratio of 3:1 with background colors.
- Color
- Do not rely solely on color to communicate meaning. Supplement the use of color with outlines, patterns, and/or shapes.
Additional Resources
Verify color contrast for visuals, background, and text using the WebAIM Color Contrast Checker.(opens in a new tab)
More information and resources for creating and editing data visualizations are available from the University of Arizona Data Cooperative Data Visualization webpage.
The ASU Image Accessibility Generator(opens in a new tab) can assist with creating alternative text and descriptions for data visualizations contained in JPG, PNG, or JPEG formats.
For images requiring alternative text in other formats, such as PDFs, Microsoft Copilot or Google Gemini can be used to generate the necessary text and longer descriptions. Upload your file to the user interface and try one of the following prompts:
“Provide alternative text under 125 characters for this image.”
“Provide a description of the contents of this image.”
More information about alternative text and examples are available from Section 508 Authoring Meaningful Alternative Text.(opens in a new tab)
MP4
MP4 files are commonly used for audiovisual or visual-only content. To make audiovisual and visual-only content accessible, use the following guidelines:
- Captions: Closed captions (CC) or open captions are required for media containing audio content.
- Closed Captions: can be added to your MP4 file by importing a SRT file containing the captions using Adobe Premiere(opens in a new tab).
- Open Captions: also known as burned-in captions, can be added directly to your MP4 file using Adobe Express or Premiere.
- Video Descriptions: required for visual-only content. Descriptions can be added to the video as audio or placed in a separate plain text, Word document, or PDF file.
- Describe the content, background, and any subjects of the video in chronological order.
- The description should be objective and avoid interpreting the content of the video. Allow the user to generate their own conclusion.
WAV
WAV (Waveform Audio File Format) files store audio-only content. Due to format limitations, WAV files cannot embed captions or transcripts directly. Text-based transcripts should be placed in a separate plain text, Word document, or PDF file. To make audio-only content accessible, use the following guidelines:
- Transcripts: required for audio content containing speech.
- Should accurately convey speech and other audio content. Avoid making changes to any speech.
- When relevant, identify speakers, non-speech sounds, and background audio in the the transcript.
- Audio Descriptions: required for audio content without speech.
- The description should objectively describe the content without drawing conclusions.
GIF
Graphic Interchange Format (GIF) may sometimes be used to show looping content or short content but should be used sparingly, when possible, due to accessibility limitations. If your deposit includes GIF files, use the following guidelines to make your media content accessible:
- Flashing
- Content should not flash, whenever possible. If flashing is unavoidable, it must not flash more than three times in one second.
- Red flashes should be avoided entirely.
- Pausing Mechanism: required for GIF content lasting for more than 5 seconds.
- If the software used to create the GIF does not provide a pause mechanism, one can be added using Adobe Photoshop to edit the loop frequency(opens in a new tab) or converting the video to a MP4 format.
- Describing Content: A text-based description and/or transcription should be provided for visual and audio content using the previous guidelines.
Resources
The University of Arizona Disability Resource Center Video Captioning Guide provides more information about caption and audio description quality standards, tools, and additional resources for adding captions and audio descriptions to your videos.
The W3C Description of Visual Information guide(opens in a new tab) provides more information and methods for creating video descriptions.
Google Gemini can assist with generating video descriptions for media that contains no audio. Upload your video directly to the Gemini using your University of Arizona NetID and try one of the following prompts:
“Provide a detailed description of this video.”
“Create alt text for the audio file.”
Source Code
Accessibility of source code is limited because it is primarily intended to be machine readable. Use of the following best practices can improve readability for users and are recommended for deposits:
- Naming Conventions
- Select camelCase or PascalCase and apply it consistently.
- Formatting
- Separate each item on a new line. For example, put multiple case conditions on separate lines.
- If possible, include in-line comments to explain the purpose of specific items. Comments can improve accessibility and reproducibility for users.
More information and resources are available from the University of Arizona Data Cooperative better software practices for reproducible research.
Maps
Map accessibility is largely dependent on the complexity of the map and software used to generate the map. To make your maps in static formats (e.g., PDFs) accessible, use the following guidelines:
- Describing Content: Include a thorough description to ensure users can access the same information contained in the map.
- Organize the description in a bulleted list (used to convey importance of information based on ranking within the list).
- Describe relationships and distance between points on the map when applicable.
- Accessible Design
- Ensure there is sufficient contrast between any text, plot points, and background colors. A helpful method to check color contrast is to test the map in black and white for readability.
- Content
- Provide underlying data that used to generate the map, if possible.
3D Models
Three-dimensional (3D) models can help users gain new perspectives and insights. However, underlying software used to generate 3D images is not always accessible. Depending on the specific software used to render the image, it may not be possible to fully meet digital accessibility guidelines due to technological limitations. To make your 3D images more accessible:
- Describing Content: Include a thorough description to ensure users can access the same information contained in the 3D model.
- Describe meaning conveyed by color or any key features.
- Describe the purpose of the image.
- Content
- Provide underlying data that used to generate the 3D model, if possible.
Using Google Workspace? More information about making your files accessible using Google applications is available from the University of Arizona DRC Google Workspace Accessibility help page.